
Revised: 10/23/2008
|
|
|
Cymbidium Culture Revised: 10/23/2008 |
Cymbidiums are the easiest of the orchids to grow outdoors in southern California, particularly along the coast and up to 15 or 20 miles inland. Cymbidiums can tolerate considerable summer heat and winter chill without damage. Many growers leave their plants outdoors all year long as we do. Temperatures up to 100 degrees F for short periods such as we encounter in a Santa Ana will not harm the plants although buds may drop on some susceptible plants. Misting or sprinkling to increase the humidity under hot conditions is beneficial. Buds and flowers may be damaged if the temperature drops to 29 degrees F but the leaves and bulbs can usually withstand 29 degrees F under shadecloth for a few hours. For temperatures lower than this, some protection will be required. We have an overhead sprinkler system which we turn on when the temperature under the shadecloth at the leaf level gets down to 29 degrees F. The sprinklers are left on continuously until the temperature gets back to 32 degrees F in the morning. This has been adequate to protect plants, buds and flowers from outside temperatures that dipped as low as 20 degrees F.
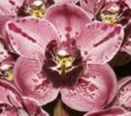
Cymbidiums grow best under partial shade-partial sun conditions. Adequate light is the most important factor to grow and flower cymbidiums well. The plants grow best with 3000 to 4500 foot candles of light intensity as measured with a light meter. 50% lath covering or 55% to 63% shade cloth overhead provides this light intensity under most conditions. Locations inland may need more shade during the summer to keep the plants from burning. During the summer, the leaves should be a yellowish green, not a deep green. Plants grown in too much shade will usually be a dark, lush green and will usually not flower well. When the plants are in bud, some additional shade will improve the color of most green and white cymbidium flowers. Too much light results in a brown or red stain called sunstain on the exposed sections of the sepals which may give the flower a muddy color and is usually undesirable. High light usually improves the color of yellow, pink, brown and red cymbidium flowers while the buds form, but can also usually cause the color to fade after the flower opens. Providing additional shade after the flowers open will hold the color and increase the flower life as well. If you provide extra shade for the flowers, remember to remove it when the flowers fall so that the plant will grow best for next year.
Cymbidiums like lots of water and prefer to be constantly moist, but not wet. During the growing season, water thoroughly once or twice a week, more often in warmer or drier locations. The amount of water will depend on the potting mix and the water quality. Rain water or demineralized water will give the best results, but water that contains large amounts of dissolved salts such as the Colorado river water we have in Southern California or hard well water can also be used with some precautions. Open or porous mixes need more water than a heavy dense mix that retains a lot of water. Water thoroughly so that water runs through the pot and out the bottom. Watering heavily so that excess water flows through the potting mix is a process called leaching which helps to keep the excess salts from Colorado River water or hard well water and fertilizer from building up in the potting mix. The excess salt buildup is the primary cause for the brown leaf tips common on cymbidiums in Southern California. Plants with ensifolium, devonianum or munronianum in the background are particularly susceptible to salt buildup in the potting mix. Letting the plants dry out and not leaching will cause the leaf tips to die back faster, particularly on hybrids with devonianum in the background. On hot days, the plants benefit from overhead misting or sprinkling to lower the temperature and increase the humidity in the growing area. During the winter, cymbidiums need less water, but should never be allowed to dry out completely. Watering every 2 or 3 weeks may be adequate, even with no rain, if the weather is cool and damp.
Cymbidiums are heavy feeders and like fertilizer to grow and bloom well. Many growers use a high nitrogen fertilizer during the growing season (February to August) and a low nitrogen fertilizer during the blooming season and winter. Others get satisfactory results with a balanced fertilizer all year long. Fertilizer is available in both water soluble and slow release forms. Most growers use a water soluble fertilizer such as Peters 30-10-10 Orchid Special or Miracid during the growing season ar a rate of one teaspoon to a gallon of water and Hi Bloom or similar low nitrogen content water soluble the rest of the year. Many amateur growers use a Hozon or Siphonex hose end injector to siphon a fertilizer concentrate into a hose to use with a watering wand. Others prefer to use a slow release fertilizer such as Osmocote sprinkled on top of the potting mix. The slow release fertilizers work well where sprinkling systems are used to water the plants. Watering a slow release fertilizer with a watering wand can wash the fertilizer granules off the plant so use care. The slow release fertilizers may be available with 3, 4 or 6 month release times. I would recommend that the amount be cut in half and the application be made twice as often. This compensates for the tapering off often seen with the slow release fertilizers. If possible, it is better to use one of the newer "lite" fertilizer combinations such as the Peters Peatlite formulations that does not contain urea as a nitrogen source. Urea requires a bacterial or chemical reaction in the potting mix to convert it to the nitrate form before the nitrogen is available to the plants, and much is washed out with subsequent waterings before it is converted.
Red spider mites and scale are the two most persistent cymbidium plant pests with snails and slugs as the principal flower threats. Spider mites are generally not a problem close to the coast if the humidity can be kept high and the temperature is below 75 F. Misting during the day increases the humidity in the growing area and helps keep spider mites under control. Warmer and drier conditions inland may require the use of a miticide to keep spider mites under control. Scale in the leaf axils can be a persistent problem that is hard to eradicate and the use of a good systemic insecticide may be required with 3 applications 2 weeks apart to get complete control. Slugs and snails may be controlled with the available snail and slug bait, preferably a granular form, not the large pellets which tend to get moldy, or with a big foot and a flashlight at night. Snail bait should be applied after watering and when the weather is going to be dry for several days afterwards. Aphids are attracted to buds and flowers and can be a serious pest if not controlled. For a small number of plants, washing the aphids off with a spray nozzle can be effective, as can 75% rubbing alcohol. Do not use an insecticidal soap or an insecticide spray with a spreader sticker on cymbidium buds. We have seen severe deformation of buds and flowers as a result. There is no toxic reaction to the plant itself and such materials may be used when buds are not present. In general, any insecticide should be applied during a cool, shady time of day, such as early morning, to minimize any potential reaction.
Cymbidiums are also subject to bacterial, fungal and viral diseases. Bacterial and fungal diseases are often associated with being too wet and crowded. Adequate spacing of plants on the bench and watering early enough in the day so that the plants can dry out before dark is the best prevention. Cymbidiums can be susceptible to the common orchid viruses. Virus infection of a cymbidium may be caused by insects feeding on an infected plant and then moving to an uninfected plant, but transmission with contaminated tools or your hands during dividing, potting or cutting the flowers is usually the cause. Always sterilize tools and the work area before dividing or repotting each plant, and wash hands thoroughly after each plant. We use a layer of newspapers on the potting bench and change between each plant to ensure a clean work surface. We also use disposable latex or vinyl gloves when dividing and repotting, and change between each plant to prevent disease transmission.
Cymbidiums like a slightly acid potting mix that provides good drainage. Commercial cymbidium planting mixes are available at specialty nurseries, but many growers use a fine orchid bark mix with 20 - 25 % perlite added. Sand, coarse peat and redwood bark or shavings are often added to improve the water retention in inland locations. Straight seedling orchid bark (1/8 to 1/4 inch) or medium orchid bark can also be used. Larger grades of bark will require more frequent watering, but there is less risk of overwatering.
Cymbidiums generally need to be repotted about every three years under normal conditions. Cymbidiums should be repotted just after the old blooms have fallen off. If the old mix is broken down, the plant should be repotted as soon as possible to minimize root rot. Broken down mix tends to hold too much water and will reduce the air movement around the roots which often causes the older roots to die back. Vigorous plants will often outgrow the pot and may even break the pot. When a cymbidium fills the pot and starts to grow against the edge, it should be repotted even if the mix is not broken down. Pot-bound cymbidiums will often be underwatered which can reduce the vigor and blooming capability.
When dividing and repotting, try to keep divisions with 3 or 4 green bulbs and perhaps one backbulb if you can. Select a pot large enough to allow 3 years growth. For most cymbidiums, a pot which allows 2 inches of room all around the plant is the proper size. Miniature cymbidiums will require smaller pots with less room for growth. Divide plants by breaking apart at the natural divisions. If necessary, use a sterilized knife to cut the rhizome and separate the bulbs. Clean the old potting mix from the roots and remove any dead or damaged roots. Dead or damaged roots can encourage root rot in the new mix. Place a mound of moist potting mix in the center of the pot. Spread the roots over the mound of mix and work mix in among the roots. Do not ball the roots in the center of the pot. The lower 1/3 of the bulbs should be covered with mix. Tap the pot firmly on the potting bench to help settle the mix around the roots and press the mix firmly around the edge of the pot with a potting stick (I use an old broken hammer handle or a piece of 1/2 or 3/4 inch PVC pipe). The mix should be tight in the pot, not loose. Mix that is too loose in the pot will not provide enough support for the roots and also tends to decompose more rapidly.
All potting tools, knives or shears and potting sticks should be sterilized after each plant to prevent the transmission of disease. Tools may be sterilized by flaming with a propane torch or by soaking in a 50% clorox solution or a saturated solution of tri-sodium phosphate (TSP) for a few minutes. Don't forget to wash your hands with soap and water also, including under the fingernails, or preferably use disposable gloves and use new ones for each plant. Your hands can transmit disease from one plant to another the same as dirty tools. Plants should be handled or divided on a clean surface. Several layers of newspaper can be spread on the work surface and any that are dirty or wet should be discarded after working with each plant.
After dividing and repotting, the plants should be placed in an area with heavier shade than normal, and should be kept cool and slightly on the dry side for several weeks. This encourages the growth of new roots into the new medium. We water the repotted plants after a day or so in the new mix, and water the first time with a dilute solution of Physan or Naccosan, which is a bactericide and fungicide, to help reduce the likelihood of fungal or bacterial disease in the newly repotted plant. Watering with a dilute solution of Subdue may also help control disease after repotting. Use of an anti-transpirant as a spray or drench after dividing and repotting may help reduce the moisture stress on a plant, but we do not find it necessary under our conditions.